Category: Uncategorized

  • How to Set Up a Print-Ready Mailer Box Dieline: Bleed, Safe Zones, and Panel Orientation

    How to Set Up a Print-Ready Mailer Box Dieline: Bleed, Safe Zones, and Panel Orientation

    The difference between a mailer box that looks sharp on the porch and one that arrives with a blurry logo and a headline sliced in half usually comes down to file setup, not print quality. Most rejected or reprinted mailer artwork fails for the same handful of reasons: art that stops at the cut line instead of running past it, text parked on top of a fold, images that looked fine on a laptop but were never big enough to print, and colors built in the wrong mode. None of that is hard to avoid once you understand how a flat corrugated blank becomes a folded box. This walkthrough covers how to set up a print-ready mailer box dieline the way a packaging printer expects to receive it.

    Start with the dieline, not the design

    A dieline is the flat, unfolded map of your box. It shows every panel, every fold as a crease line, and every cut as a solid line, all laid out in one plane. The single most important habit is to build your artwork on top of the dieline the printer gives you, at the exact size they supply, rather than designing a nice front panel and hoping it maps onto the box later. A roll end tuck front mailer, the self-locking style most common for ecommerce and subscription shipments, unfolds into a shape where the lid, the base, two side walls, and several tuck and dust flaps all sit in different orientations. If you design blind and let the printer drop your art onto their template, the odds of a panel landing sideways go up sharply.

    Keep the dieline on its own layer, locked, set to a non-printing spot color, and place all of your artwork on a separate layer beneath it so the crease and cut marks stay visible while you work. If you are adding finishing effects such as spot gloss, foil, or embossing, each of those belongs on its own clearly named layer drawn in a single flat spot color, because the printer treats them as separate tooling passes rather than part of the CMYK image.

    Bleed, trim, and the safe zone

    Three boundaries govern where your art can safely live, and the schematic below shows all three on a single panel. The trim line is where the blade actually cuts. The bleed is the margin you extend background color and imagery past that trim line so a tiny shift on the cutting table never leaves a sliver of bare board at the edge. The standard bleed for packaging is 3 millimeters, roughly an eighth of an inch, on every outer edge. The safe zone is the opposite buffer: an inner margin where you keep anything you cannot afford to lose, such as logos, body copy, legal text, and barcodes. Six millimeters in from every cut and fold is a sensible working minimum, and more is better near creases because folding steel rounds the corner of a printed image and can distort anything sitting right on the line.
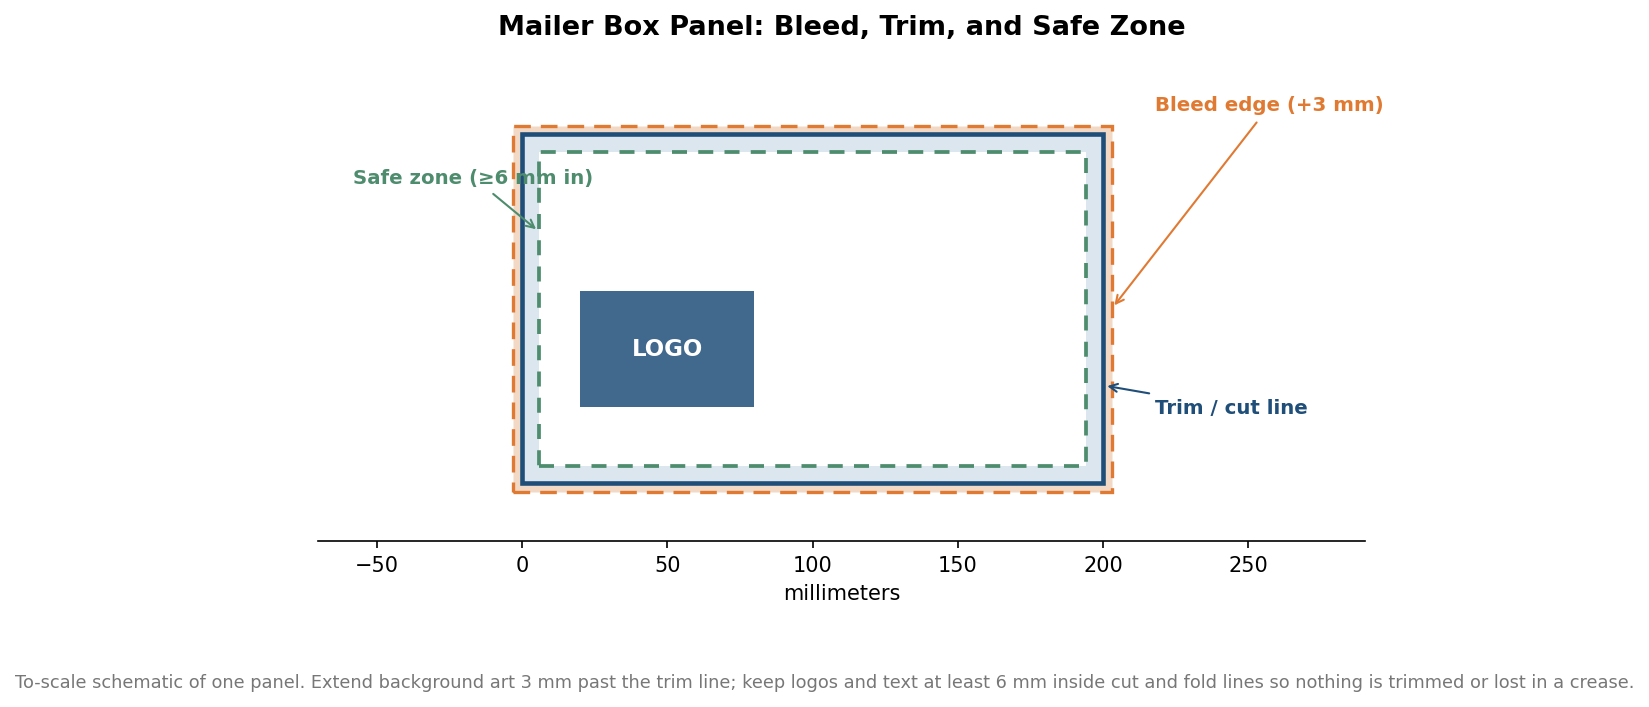
    To-scale schematic of a mailer box panel showing the bleed edge, trim line, and inner safe zone with a logo placed inside the safe area
    Extend background art 3 mm past the trim; keep logos and text at least 6 mm inside cut and fold lines.

    The fold rule deserves its own emphasis. A crease is not a clean hinge; it crushes and stretches the board across a few millimeters, so a line of text straddling a fold will look broken even when the file was perfect. Slide it fully onto one panel. Barcodes are the other classic casualty. They need quiet space and a flat panel to scan reliably, so give them a generous margin and never let one wrap a corner.

    Resolution and color that survive printing

    Corrugated printing is unforgiving of low-resolution raster art. The number that matters is not the pixel dimensions of your file in the abstract but the effective resolution at final print size, which is simply the image’s pixel width divided by the width it will be printed. Aim for at least 300 pixels per inch at the size the art actually appears on the box. A logo that looks crisp at thumbnail size on screen can be well under that threshold once it is stretched across a lid, and the chart below shows how quickly effective resolution falls as the same source image is scaled up.
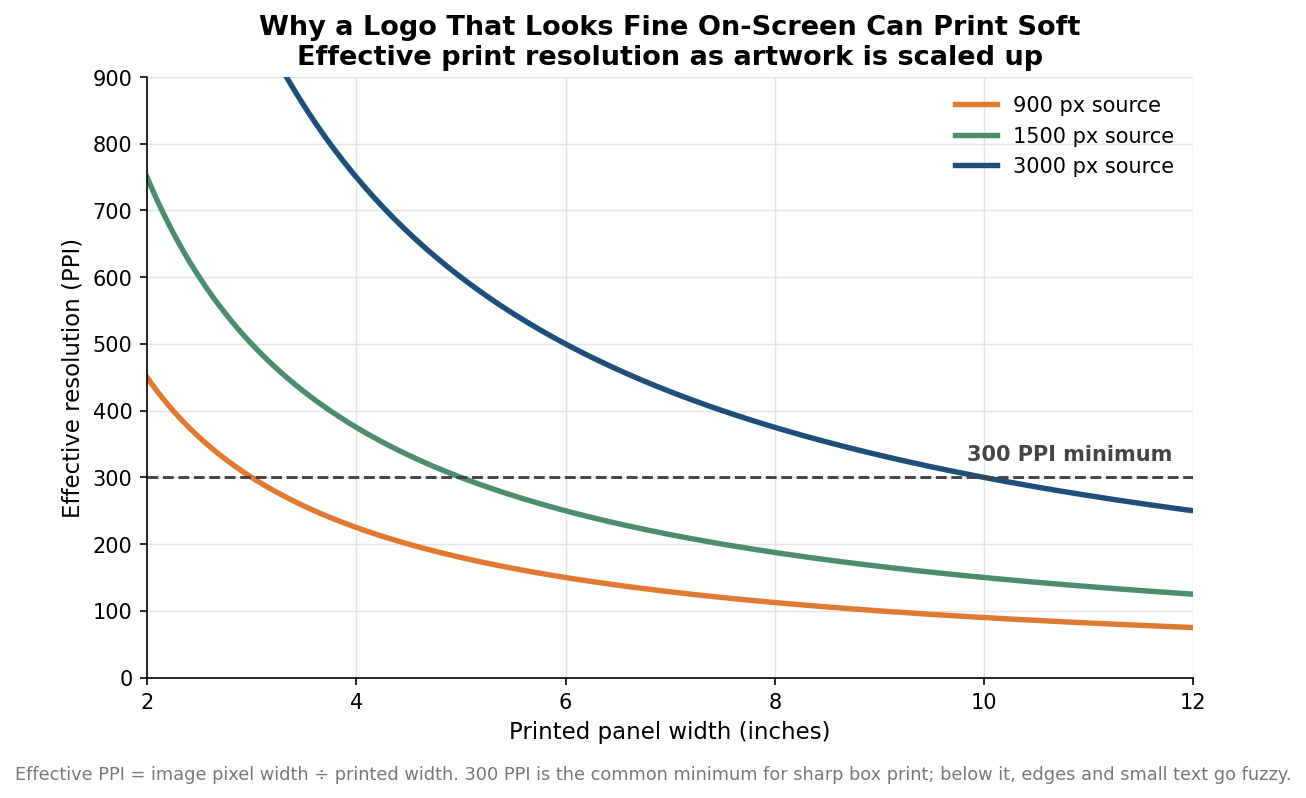
    Line chart showing effective print resolution in PPI dropping as artwork is scaled to wider printed panels, with a 300 PPI minimum line
    The same image loses effective resolution as it is scaled up; keep art above 300 PPI at final print size.

    The practical takeaway is to source logos and key graphics as vector files whenever possible, because vector art stays sharp at any size and sidesteps the resolution question entirely. Save logos as vector, convert all live text to outlines before you submit so a missing font never reflows your layout, and either embed linked images or send them alongside the working file. For photographs and other raster elements that cannot be vectorized, build them large enough to clear 300 ppi at final size rather than enlarging a small file after the fact, which invents detail that was never there.

    Color is the last common trap. Screens display in RGB, but presses print in CMYK, and a saturated RGB blue or a bright RGB green will shift noticeably when converted. Build the file in CMYK from the start so what you approve on screen is closer to what comes off the press, and if a specific brand color has to be exact, ask whether the run supports a spot color for it rather than relying on a four-color mix.

    Panel orientation and the base flip

    This is the step that surprises first-time buyers. Because of how a roll end mailer folds, the artwork on the base panel is often rotated 180 degrees relative to the lid on the flat dieline, so that both read upright once the box is assembled. If you place a repeating pattern or a centered message without checking orientation, half of it can end up upside down on the finished box even though the flat file looked correct. Every reputable printer publishes an orientation guide or marks “this way up” on the template. Follow it panel by panel, and physically fold a printed proof or a paper mock-up before approving a full run, because a two-minute paper fold catches orientation mistakes that are invisible on a flat screen.

    A five-minute preflight before you upload

    Before you send files, walk one quiet lap through the checklist. Confirm the document is CMYK and that 3 millimeters of bleed extends past every outer edge. Check that logos, text, and barcodes sit at least 6 millimeters inside every cut and fold, with nothing crossing a crease. Verify that every raster image clears 300 ppi at its printed size and that vector logos are used where you have them. Make sure all text is outlined and all images are embedded or included. Finally, confirm each panel’s orientation against the dieline guide and, ideally, against a folded paper proof.

    Lead times on custom mailers typically run in the range of one to three weeks from approved artwork depending on quantity, finishing, and whether you order a physical proof, and that figure is indicative rather than a quote for any specific job. The files you approve at the start of that window are exactly what ships at the end of it, so the preflight pass is the cheapest quality control you will ever run. Get the dieline, bleed, resolution, color, and orientation right, and the box that lands on a customer’s doorstep looks like the one you designed.
  • Digital, Flexo, or Litho: Choosing a Print Method for Custom Mailer Boxes

    Digital, Flexo, or Litho: Choosing a Print Method for Custom Mailer Boxes

    The print method decides more about a mailer box’s cost and look than almost any other choice you make. The same dieline can arrive as a crisp full-color unboxing centerpiece or a clean two-color shipper depending on how the ink gets onto the board, and the right answer swings entirely on how many boxes you are ordering. Three processes cover the vast majority of custom mailers: digital, flexographic, and litho-laminated. This guide walks through what each does, where its economics make sense, and how to match the method to your order size instead of overpaying or underdelivering.

    The three ways ink reaches corrugated

    Digital printing sprays full-color CMYK straight onto the board with no plates. Because there is no tooling to make, it carries essentially zero setup cost and will run an order as small as a single box. It handles photographic images, gradients, and complex full-coverage artwork well, which makes it the natural fit for short runs, prototypes, seasonal variants, and any design that leans on rich imagery. The tradeoff is that its per-box price stays roughly flat as volume climbs; you never amortize a setup fee away, so at large quantities it stops being the cheapest route.

    Flexographic printing uses raised rubber or polymer plates, one per color, to stamp ink onto the board. Those plates typically cost somewhere in the range of $200 to $800 or more each depending on size, and that cost is why flexo makes no sense for a handful of boxes. It shines with one to four spot colors and simple, bold graphics rather than fine gradients or photos. Once you spread the plate cost across a large run, though, the per-box price drops below what digital can offer, which is why flexo dominates high-volume shipping cartons.

    Litho-lamination prints a sheet on an offset press, then laminates that printed sheet onto the corrugated board. It delivers the highest print fidelity of the three and supports premium finishes like foil, spot UV, and embossing, so it is the choice when a box is retail-facing and visual impact drives sales. The two-stage process adds plate costs, lamination, and longer lead times, which makes it the most expensive per unit until volumes get large enough to absorb that setup.

    Where each method earns its keep

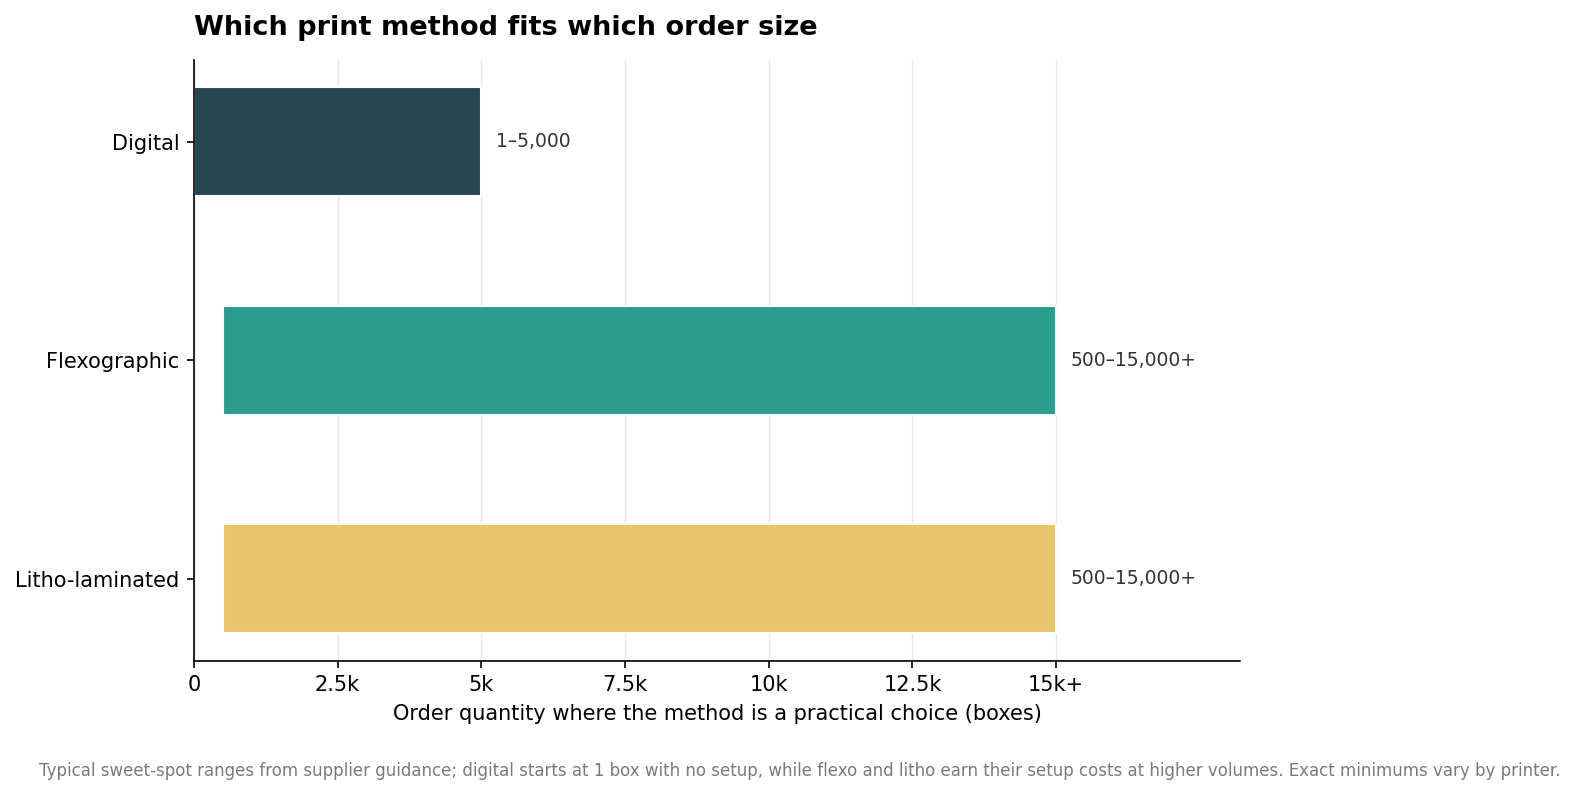
    The decision is really a quantity decision. Digital owns the low and middle of the range, roughly from a single box up through a few thousand, because its zero-setup pricing beats any method carrying plate costs there. Flexo and litho typically start to make sense from around 500 units and up, but they only become the cheaper option once the run is large enough to dilute their setup. Industry guidance commonly points to litho-lamination’s per-unit cost dropping significantly past about 5,000 units.

    Horizontal bar chart of practical order-size ranges by print method: digital from 1 to about 5,000 boxes, flexographic and litho-laminated from about 500 upward
    Typical order sizes where each method is a practical choice; digital owns the low end, plated methods the high end.

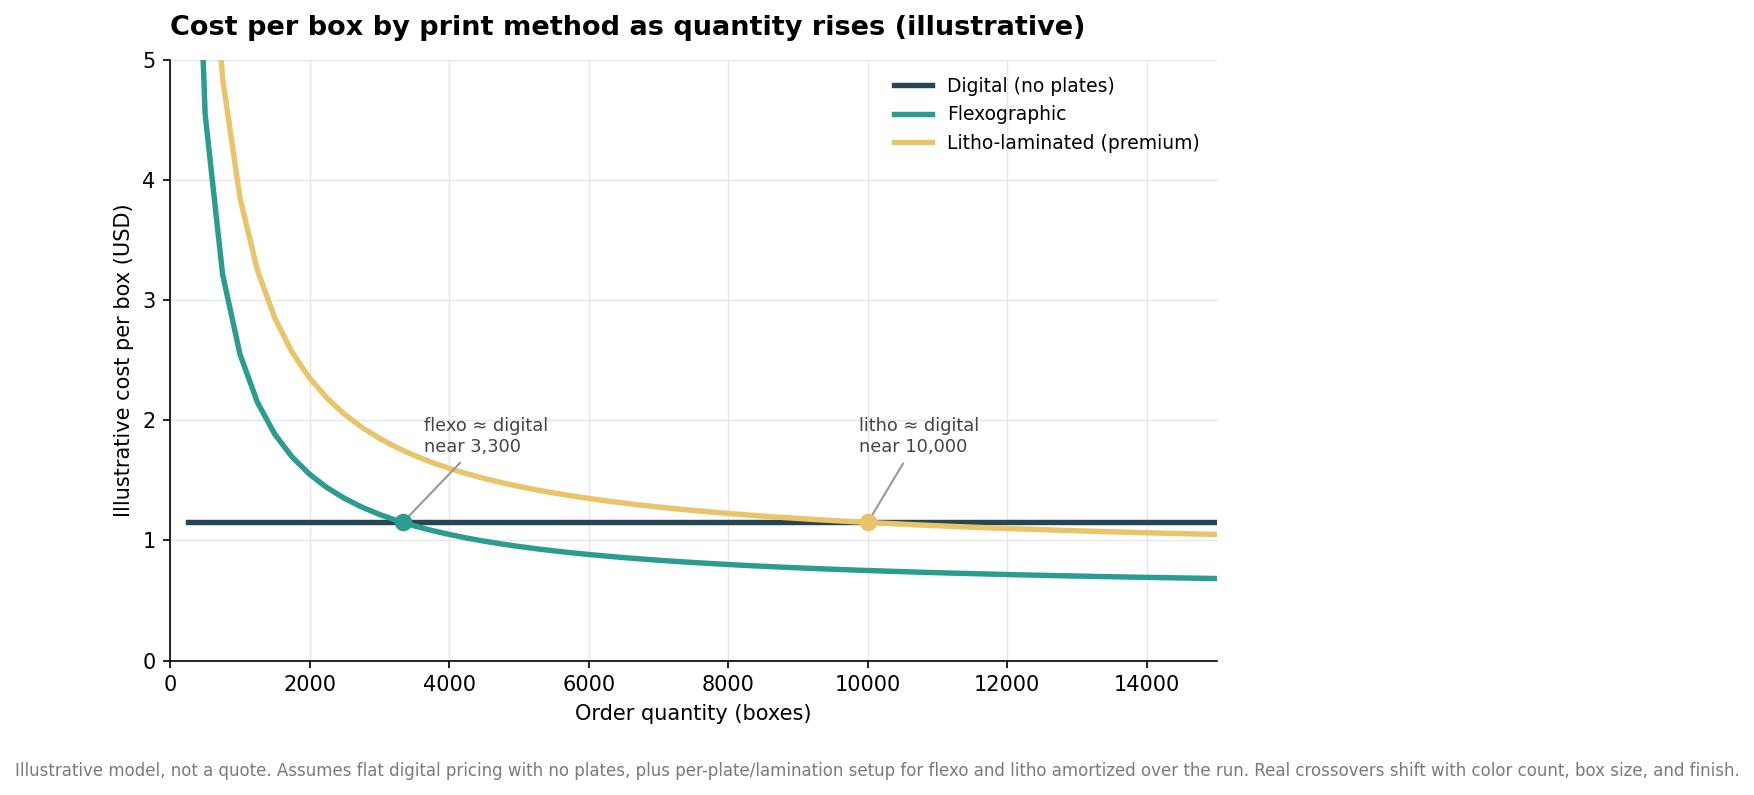
    A simple cost model shows why the crossover exists. If digital holds a flat price per box while flexo and litho spread a fixed setup across the run, the plated methods start expensive and fall as quantity rises, eventually crossing under the flat digital line. The exact crossover moves with color count, box size, and finish, but the shape is dependable: below it, digital wins on price and flexibility; above it, the plated methods win on unit cost.

    Line chart of illustrative cost per box versus order quantity, with flexographic crossing below flat digital pricing near 3,300 boxes and litho near 10,000
    Illustrative cost per box: plated methods start high and fall below flat digital pricing as volume grows.

    Two caveats keep this honest. The figures in the chart above are an illustrative model, not a quote; real pricing depends on your specific dimensions, board grade, number of colors, and any special finishes. And cost is not the only axis. A 2,000-box order of a photographic design may still be cheaper and better on digital even though flexo could technically run it, simply because matching that artwork in spot colors would be impractical.

    Buying mistakes that quietly cost money

    The most common error is ordering plates for a quantity that never needed them. A brand orders 750 boxes on flexo to feel established, pays several hundred dollars per plate, and ends up with a higher per-box cost than a plate-free digital run would have delivered at that volume. The mirror mistake is stretching digital into tens of thousands of identical boxes and paying its flat rate long after a plated method would have been cheaper. Both come from picking a process by reputation instead of by the math of the actual order.

    Two smaller mistakes add up as well. Choosing litho for a design that has no photographic or premium-finish content pays for fidelity the artwork never uses, while trying to force a full-color photo onto a low-color flexo run produces muddy results that undercut the whole point of custom packaging. Match the process to what the design actually demands, not to a tier that sounds more premium.

    Matching the method to your order

    Work from your real numbers, in this order: quantity, then artwork, then finish. If you are ordering a few hundred to a few thousand boxes, or you need photographic imagery and full-bleed color, digital is almost always the right call and spares you any plate fees. If you are buying many thousands of a stable design with a handful of solid colors, flexo will usually deliver the lowest cost per box for a plain shipper. If the box is the first thing a customer sees and you want foil, spot UV, or a laminated sheen at scale, litho-lamination justifies its premium, provided your volume is high enough to absorb the setup.

    One practical move saves the most money: lock the artwork before you commit to plates. Digital’s lack of tooling means a design change costs nothing but a new file, while a revision after flexo or litho plates are cut means paying for tooling twice. Prototype and approve on digital, then move the finalized design to a plated method once your volume clearly justifies it. Choose the process to fit the order rather than forcing the order to fit a process, and the box will look right and price right at the same time.

  • How Much Do Custom Mailer Boxes Cost? A Buyer’s Pricing Breakdown

    How Much Do Custom Mailer Boxes Cost? A Buyer’s Pricing Breakdown

    Ask three suppliers what a custom mailer box costs and you can easily get quotes that range from under a dollar to more than four dollars for what looks like the same box. That spread is not a mistake or a markup game. Mailer box pricing is built from a handful of levers, and once you understand which levers move the number the most, you can read a quote, compare vendors fairly, and specify a box that hits your budget without paying for things you do not need.

    What a printed mailer box actually costs

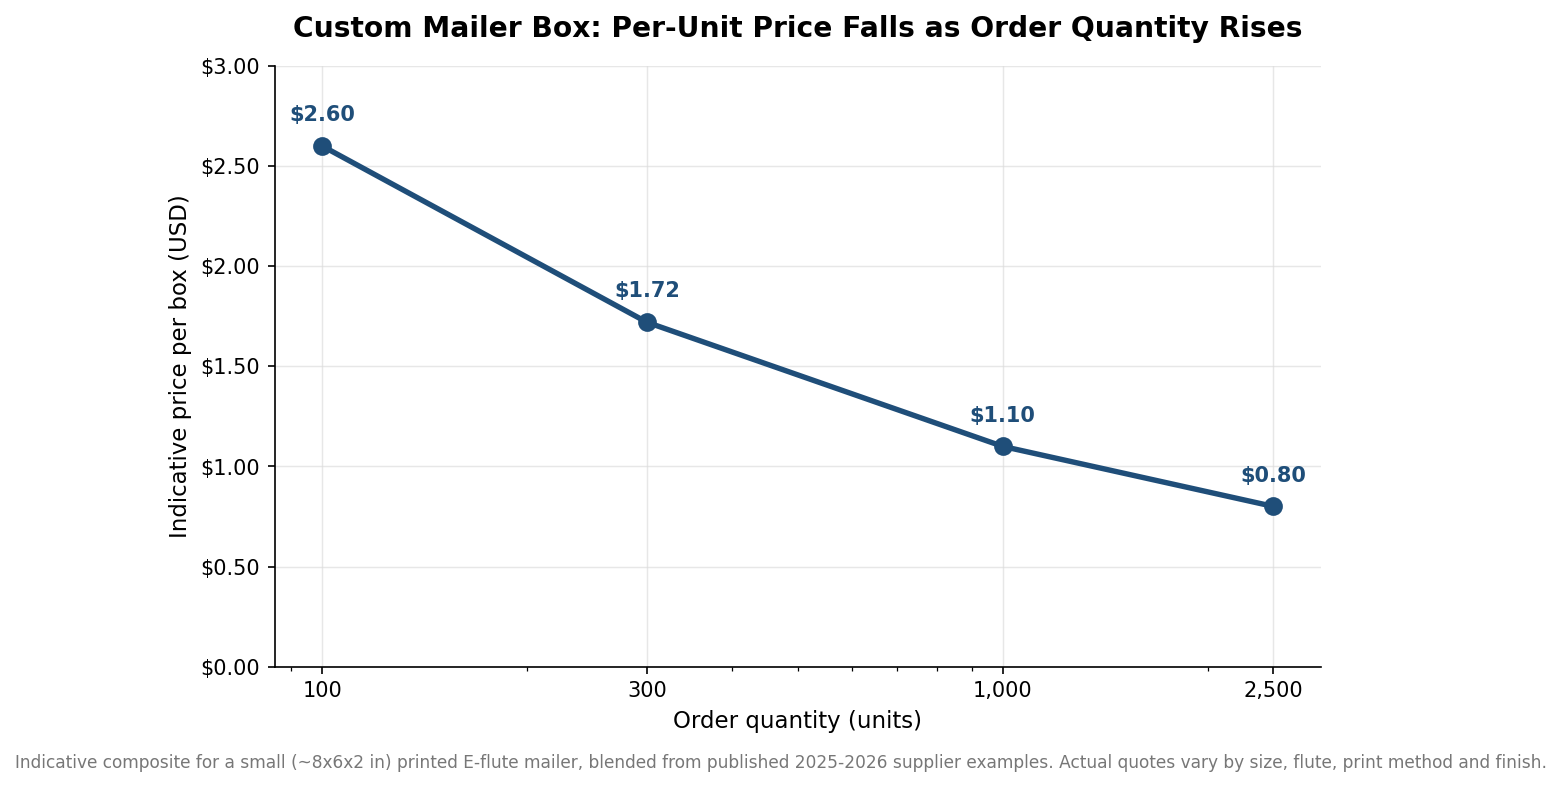
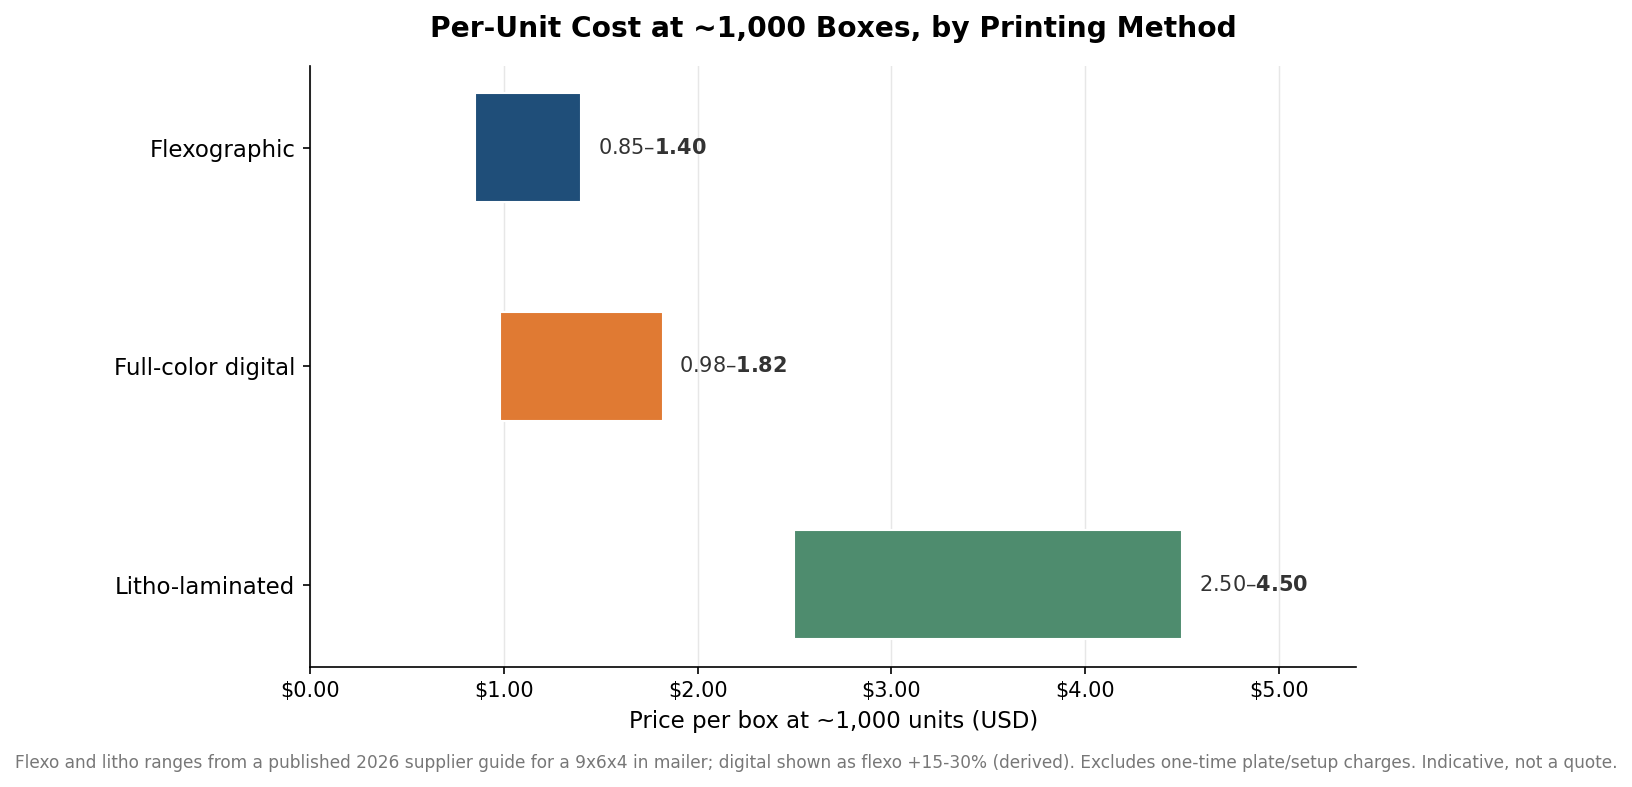
    For a small, full-color E-flute mailer, published 2025-2026 supplier examples land roughly between $0.80 and $2.60 per box, with the low end reserved for larger runs and the high end for small test batches of a few hundred. A common reference point in the trade is a 9 by 6 by 4 inch flexo-printed mailer at 1,000 units, which several suppliers quote in the $0.85 to $1.40 range. Move to a retail-grade litho-laminated box at the same quantity and the same footprint can run $2.50 to $4.50. These are indicative figures rather than firm quotes, because the exact number depends on the levers described below, but they frame the territory you should expect to operate in.

    Minimum order quantities usually start somewhere between 100 and 300 units for custom-printed corrugated, depending on the printer and the method. Below those thresholds the one-time setup costs simply have too few boxes to spread across, which is why a run of 50 fully printed boxes can cost more per unit than a run of 300.

    Line chart showing indicative per-unit price of a small printed E-flute mailer box falling from $2.60 at 100 units to $0.80 at 2,500 units
    Per-unit price drops sharply between a few hundred and a few thousand boxes, then flattens.

    Why quantity moves the price more than anything else

    The single largest driver of per-unit cost is how many boxes you order, because most of what you pay up front is fixed regardless of run length. Tooling for the die, artwork setup, and print plates are charged once and then divided across every box in the run. Order 100 boxes and each one carries a large slice of that fixed cost. Order 2,500 of the same box and the slice per unit shrinks dramatically, which is why the curve above falls steeply between a few hundred and a couple of thousand units and then flattens.

    Plate and setup charges are the reason. Flexographic printing typically carries plate charges of $200 to $1,500 per color per design, so a four-color flexo box can accumulate $1,200 to $3,000 in setup before a single box is produced. Spread that across 300 boxes and it dominates the price; spread it across 5,000 and it nearly disappears. This is also why buyers who expect to reorder often choose a slightly higher first run: the tooling is already paid for, and repeat orders skip most of the setup.

    Horizontal range bars comparing per-box cost at about 1,000 units for flexographic, full-color digital, and litho-laminated printing
    At roughly 1,000 boxes, flexo is cheapest per unit and litho-lamination carries a premium for retail-grade print.

    Printing method changes the whole equation

    The print process you choose sets both your setup cost and your break-even quantity. Digital printing carries essentially no plate setup, which makes it the economical choice for shorter runs, generally from about 250 to 2,500 boxes. Because there is no per-color plate to pay for, digital is forgiving of complex, full-coverage artwork at low volume. Its downside is that the per-piece cost stops falling as fast at scale, so somewhere in the 2,000 to 3,000 range it typically becomes more expensive than flexo.

    Flexographic printing flips that trade-off. You pay for plates up front, but the per-box cost at volume is low, which makes flexo the workhorse for runs of roughly 2,500 and up, especially for simple one-to-three-color designs. Litho-lamination sits at the premium end: a separately printed litho sheet is mounted to the corrugated board, giving photographic print quality suited to retail-ready packaging, and it generally makes sense at 1,000 units and above where the finish justifies the cost. Matching the method to your quantity and artwork is often worth more savings than shopping the same method across vendors.

    Size, board grade, and finishes

    After quantity and print method, the physical box is the next lever. Larger internal dimensions use more board, so cost scales with the surface area of the unfolded box rather than with volume in a neat way; a box that is only an inch larger in each direction can use noticeably more material. Board grade matters too. E-flute, the thin corrugated common to mailers, is the economical default and prints cleanly; heavier flutes or double-wall constructions add both protection and cost, and are usually reserved for heavier or more fragile contents.

    Finishes are where budgets quietly inflate. A basic matte or gloss lamination is often included or inexpensive, but specialty touches add real money per unit: foil stamping and spot UV each require additional passes and, in the case of foil, additional tooling. Full-color printing on the inside of the box as well as the outside also raises the price, since it adds coverage and, in some constructions, another layer to the build. None of these are wrong to choose, but each should earn its place, because on a large run a small per-unit adder becomes a large line item.

    Lead times and getting an accurate quote

    Plan your calendar around the method. Standard custom corrugated production commonly runs 2 to 3 weeks from artwork approval, with a total corrugated turnaround often cited around 10 to 20 days once setup is included. Litho-laminated boxes take longer, frequently 4 to 6 weeks, because of the extra print-and-mount step. Rush production of 5 to 10 business days is usually available but tends to add a 15 to 30 percent premium, so building in lead time is one of the cheapest ways to control cost.

    To get a quote you can actually compare, give every supplier the same brief: exact internal dimensions, the quantity or quantities you want priced, how many colors and whether you are printing inside and out, the board grade or flute if you know it, any finishes, and your shipping terms. Terms matter more than buyers expect, since duties-included pricing and duties-separate pricing can move the delivered number substantially. When you hold those variables constant, the quotes line up and the real differences between vendors become visible instead of hidden inside mismatched assumptions.

  • Mailer Box Board Specs: Flutes, Strength Grades, and Dimensional Weight

    Mailer Box Board Specs: Flutes, Strength Grades, and Dimensional Weight

    Two specifications decide whether a mailer box does its job, and neither is the print on the outside. One is the board itself, the corrugated structure that determines how much abuse the box absorbs. The other is its dimensions, which quietly set what the carrier charges you to ship it. Most buyers pick a size that looks right and a board the supplier defaults to, then wonder why boxes crush in transit or shipping invoices run high. Here is how to read both numbers.

    Flute profiles: the wave inside the board

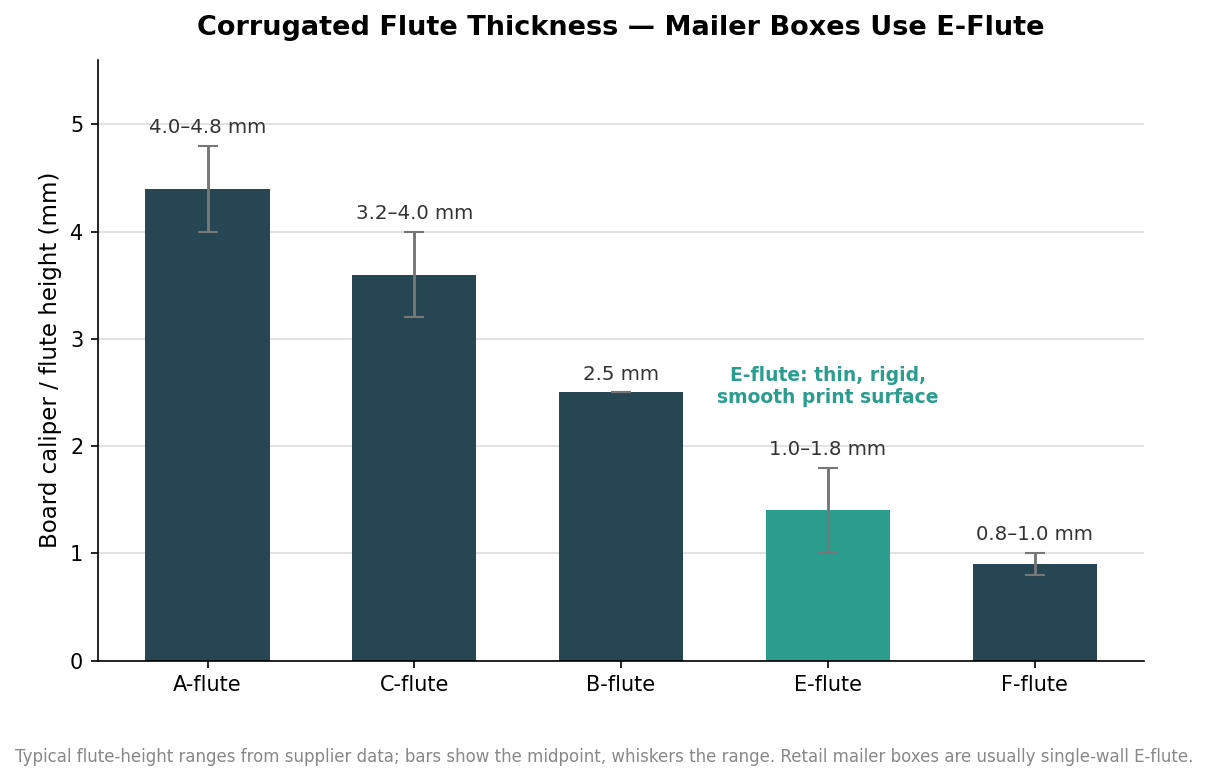
    Corrugated board gets its strength from the fluted layer sandwiched between two liners, and flute size is graded by letter. The larger profiles are thick: A-flute runs about 4.0 to 4.8 millimeters and C-flute 3.2 to 4.0, with relatively few, tall flutes per foot that give cushioning and stacking strength for bigger shippers. B-flute sits around 2.5 millimeters. The smaller profiles are where mailer boxes live: E-flute is roughly 1.0 to 1.8 millimeters with 94 to 96 flutes per foot, and micro F-flute is thinner still at 0.8 to 1.0 millimeters.

    Bar chart of corrugated flute thickness in mm from A-flute (4.0-4.8mm) down to F-flute (0.8-1.0mm), with E-flute highlighted as the mailer box standard
    Flute grade sets board thickness; mailer boxes use thin, rigid E-flute for clean folds and print.

    Retail mailer boxes are almost always single-wall E-flute, and for good reason. The tight, shallow flutes make a board that stays thin and rigid, folds crisply into the roll-end tuck shape a mailer uses, and presents a smooth, dense surface that prints cleanly, which matters when the box is a branding piece. Step up to B-flute when the contents are heavier or need more crush resistance and you can accept a slightly bulkier wall. Reserve the thick A and C flutes and double-wall constructions for larger shipping cartons, not unboxing-experience mailers.

    Two ways to measure strength, and they are not the same

    Board strength is certified two different ways, and confusing them leads to over- or under-buying. The Edge Crush Test (ECT) measures stacking strength, how much top-to-bottom load the board’s edges bear, reported as a number like 32 ECT. Roughly, 23 ECT supports around 20 pounds, 32 ECT around 65 pounds, and 44 ECT around 95 pounds of box contents in typical use. The Mullen or burst test measures something else entirely: puncture resistance, reported as a pound rating such as 200#, 275#, or 350#. A 200# burst board is the common standard-duty grade, with 275# for heavy-duty and 350# for industrial.

    The key point is that ECT and burst are not interchangeable. A 32 ECT rating and a 200# burst rating are both “standard” single-wall grades and often quoted as rough equivalents, but one tells you about stacking on a pallet and the other about resisting a puncture. Wall construction sets the ceiling on both: single-wall board runs about 3 to 5 millimeters and handles roughly 20 to 120 pounds, double-wall runs 5 to 7 millimeters for 80 to 180 pounds, and triple-wall goes beyond that for freight. Ask your supplier which test their box maker’s certificate reports, and match it to how your boxes actually travel and store.

    Reading the numbers for a mailer box specifically

    For a direct-to-consumer mailer carrying a light product, most of this strength is headroom you may not need. A single-wall E-flute box in a standard grade already protects apparel, cosmetics, supplements, or small electronics through the parcel network, where boxes travel individually rather than stacked ten high on a pallet. Over-specifying to double-wall or a high ECT adds material cost and weight for protection a two-pound product will never call on. The smarter move for light goods is to hold a sensible standard board and put your attention on the dimension that actually drives cost.

    Dimensional weight: why an empty inch costs money

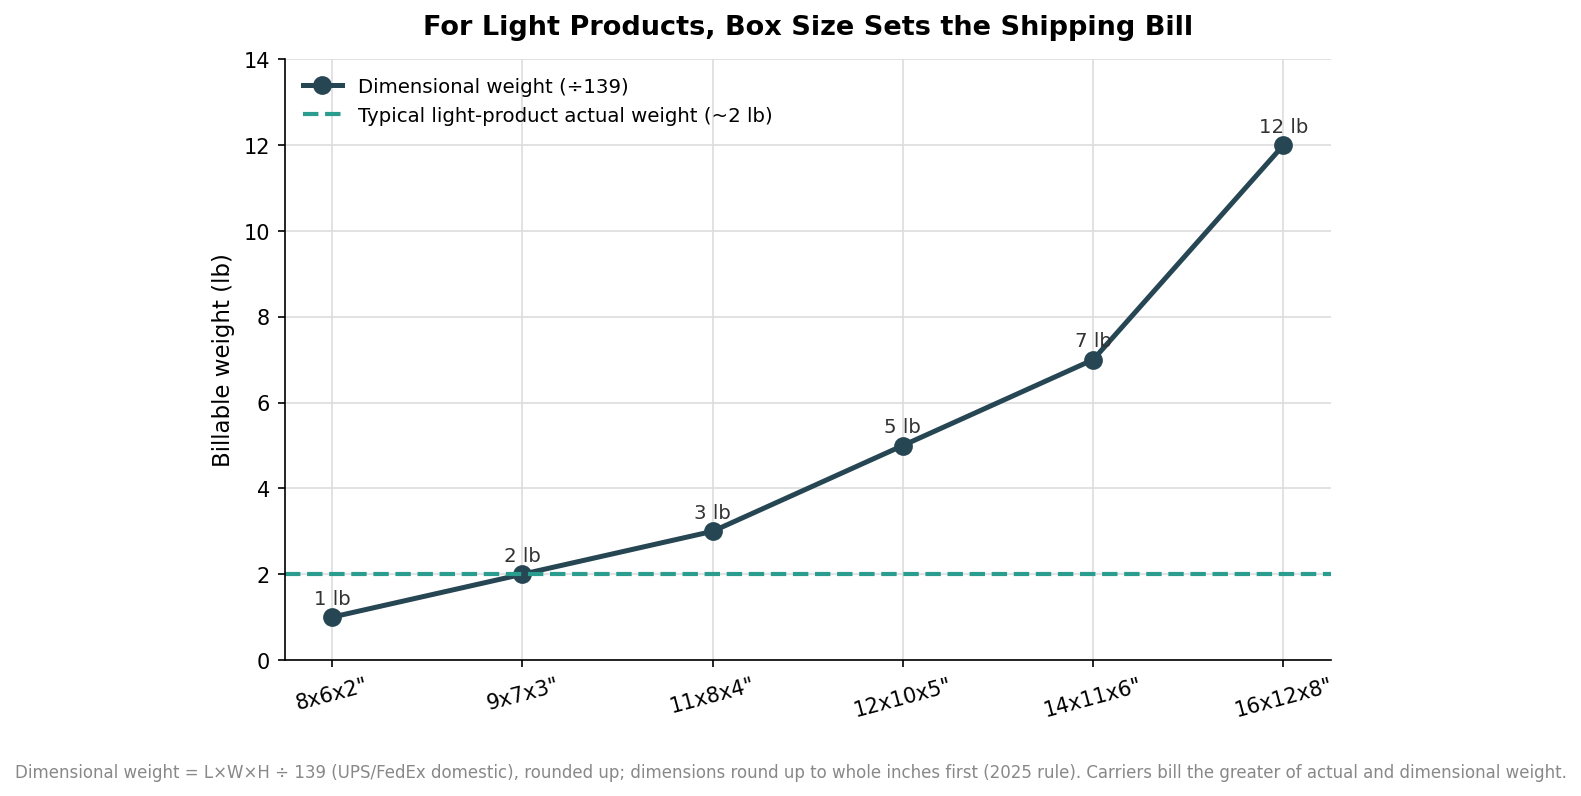
    Carriers stopped billing purely by scale weight years ago; now they bill by whichever is greater, actual weight or dimensional weight. Dimensional weight converts a box’s size into a billable weight using a divisor: length times width times height, in inches, divided by 139 for UPS and FedEx domestic shipments. USPS applies a divisor of 166 to Priority Mail packages over one cubic foot. Since a rule change that took effect in 2025, every fractional inch is rounded up to the next whole inch before the formula runs, so an 11.1 by 8.5 by 6.2 inch box is calculated as 12 by 9 by 7, inflating its dimensional weight by nearly 40 percent.

    Line chart showing dimensional weight rising with box size, crossing above a typical 2-pound actual weight so larger boxes are billed on dimensional weight
    As the box grows, dimensional weight overtakes a light product’s actual weight and sets the bill.

    The consequence for a light product is stark. A roomy 16 by 12 by 8 inch box works out to 1,536 cubic inches, and 1,536 divided by 139 rounds up to a billable 12 pounds even if the actual contents weigh two. You pay to ship air. This is why the same product in a right-sized mailer can cost a third of what it costs in an oversized carton.

    Specifying a mailer box to avoid the surcharge

    Design the box to the product, then design the dimensions to the DIM rule. Measure the product with its protective void fill in place and choose internal dimensions with only the clearance you need, because every extra inch of height or width compounds in the volume calculation. Given the round-up rule, aim for whole-inch dimensions rather than landing at 6.2 inches and getting billed as 7. Where a product line spans a few sizes, a small ladder of right-sized mailers almost always beats one large box used for everything. Run your candidate dimensions through the divisor before you order, compare the result to the product’s actual weight, and you will know the real per-parcel cost before you commit to a die.

    Get the board grade right so the box survives the trip, and get the dimensions right so you are not paying to ship empty space, and the specification is doing exactly what a good mailer box should: protecting the product without inflating the invoice.